Winter throws static, wind, and scarf friction at your hair like it has a personal vendetta. You still want styles that look pretty, feel warm, and hold up under a beanie without turning crunchy. I braid my hair all season because braids lock in moisture, resist static, and survive coats and hoods. I rounded up 9 Nordic braid styles that look effortless and cozy, and I share how I actually wear them on real days with real weather.
You’ll get clear steps, quick product matchups, and smart tweaks that save your ends. I also added a simple interactive picker so you can match a braid to your day without scrolling forever. Sound good? Let’s braid like we mean it.
Quick Answer: What are the best Nordic braids for winter?
Dutch twin braids, crown braid, fishtail side braid, rope braid pony, four-strand plait, pull-through braid, braided bun, accent “Viking” braids, waterfall braid with tucked ends.
Why they work: They control flyaways, reduce friction, and stay neat under hats and scarves while still looking romantic.
Winter Prep That Makes Every Braid Better
You win the braid before you start braiding. I keep prep fast because mornings move fast.
- Hydrate: Mist a leave-in conditioner through mid-lengths and ends. You soften the cuticle and block frizz before it forms.
- Seal: Smooth a tiny drop of serum or light oil over the last third of your hair. You lock moisture in so wool and wind don’t rough up strands.
- Grip: Work a texturizing spray or mousse from roots to mid-lengths. You give clean hair grip so braids hold without sliding.
- Fabric: Wear a silk-lined beanie or scarf when you can. You cut static at the source. FYI, that one change does more than any brush.
Tools That Earn Their Keep
You don’t need a drawer full of gadgets. You need a few reliable tools.
- Clear elastics for neat ends
- Silk or satin scrunchies to anchor buns without dents
- Alligator clips to park sections while you braid
- Wide-tooth comb to detangle without snaps
- Flexible hairspray for touchable hold
- A pea-size styling balm for edge control and polish
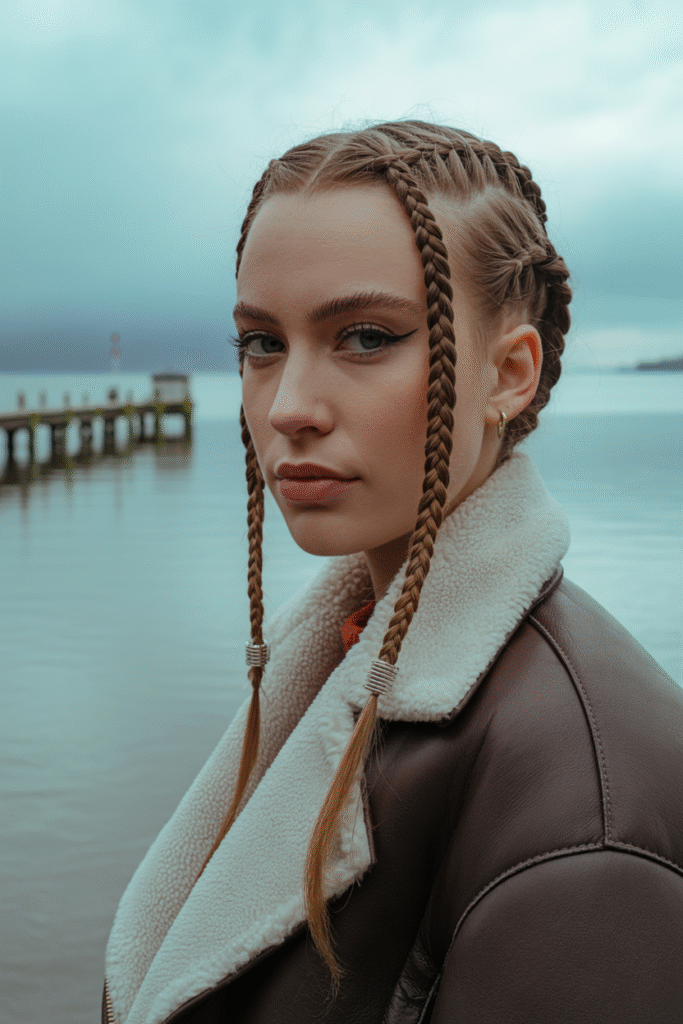
1) Dutch Twin Braids
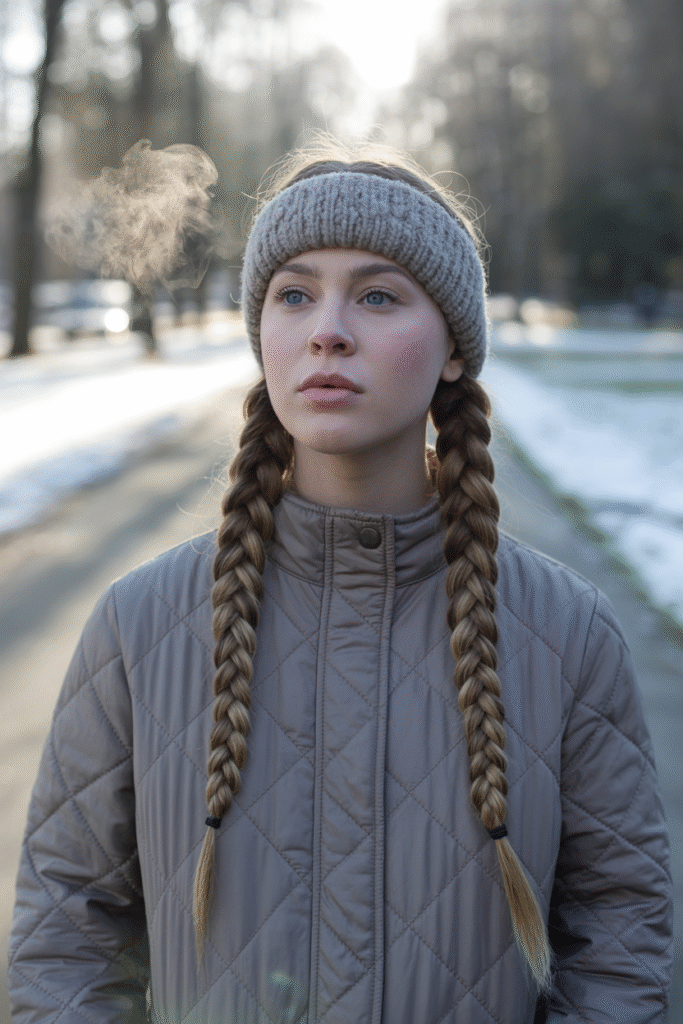
You want sporty, tidy, and hood-friendly. Dutch twin braids deliver every time.
Why it works in winter
You lock strands under the braid instead of over, so the texture sits proud and resists flattening under a hat. You contain flyaways and prevent tangles on windy days.
How I do it
- Part down the middle from forehead to nape.
- Clip one side away.
- On the free side, pick up a top triangle and split into three.
- Cross the side sections under the middle as you add hair down the path.
- Braid to the nape, then switch to a regular three-strand to the ends.
- Repeat on the other side and pancake the edges for volume.
Pro tips
- Prep with mousse if your hair slips.
- Edge balm tames baby hairs around your temples.
- Ear-warmer headband keeps you warm without crushing the braid base.
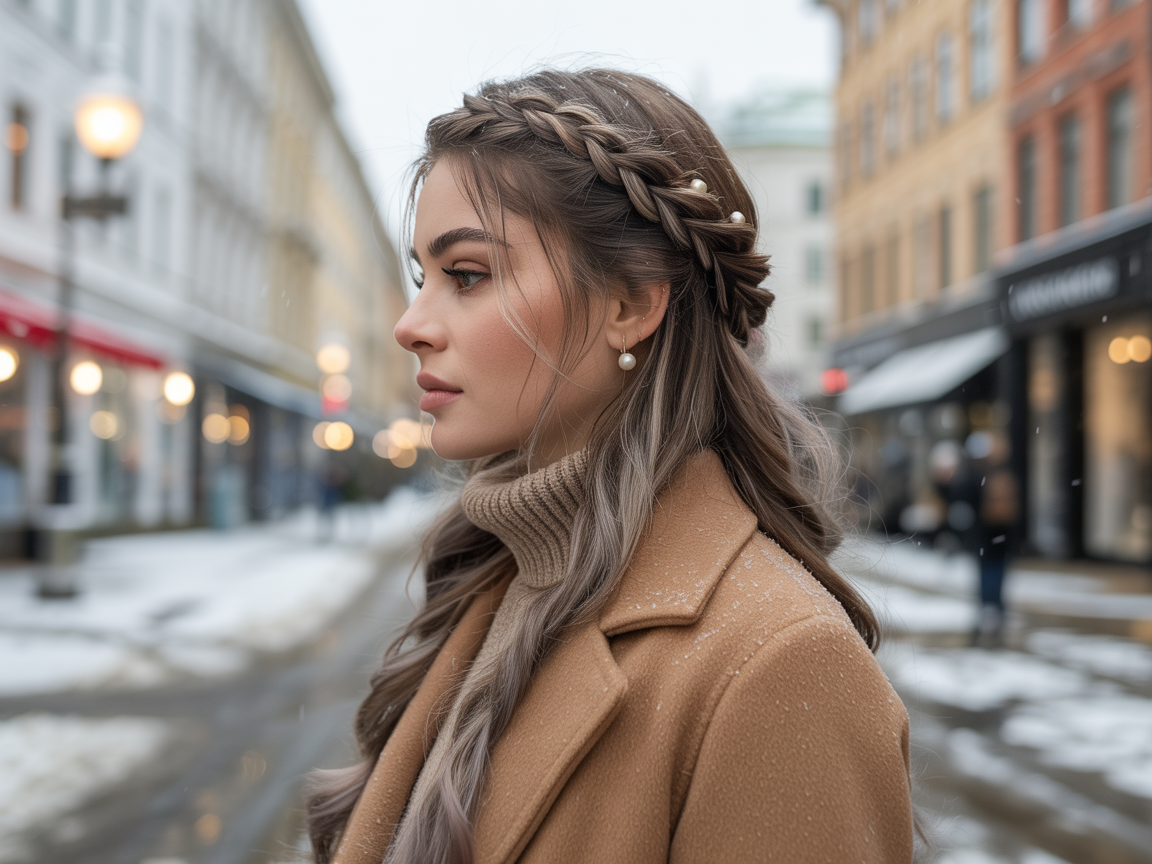
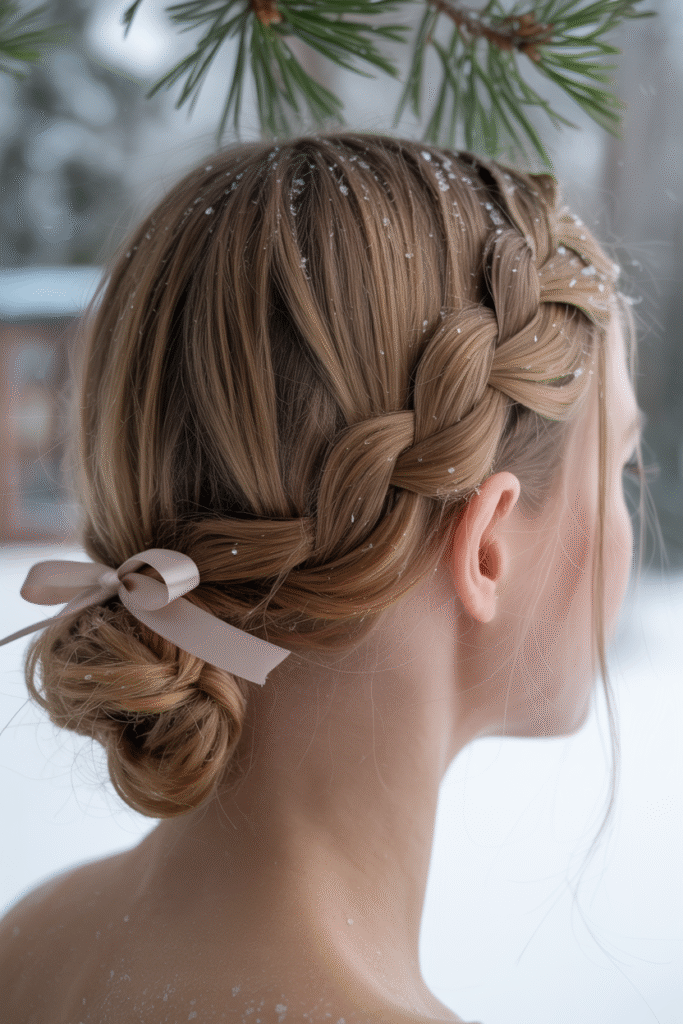
2) Crown Braid (Milkmaid Braid)
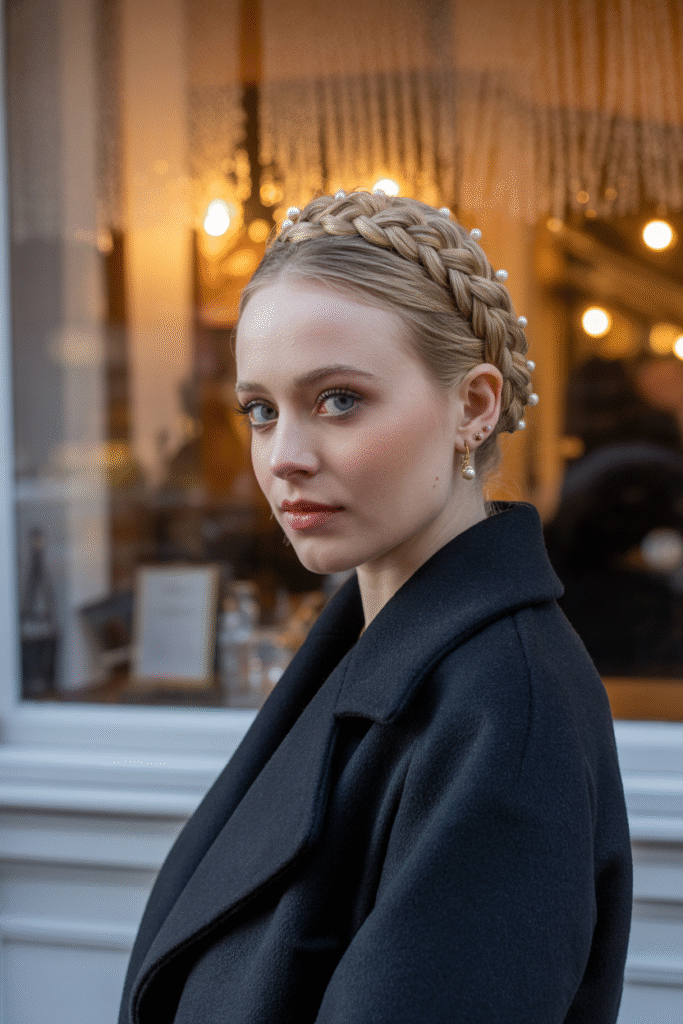
You want instant romance that works with a scarf and statement earrings. The crown braid never fails.
Why it works in winter
You lift hair off your neck and protect ends from coat friction. You also avoid hat dents because the braid frames the crown instead of sitting right on it.
How I do it
- Part slightly off-center.
- Braid two low pigtails or make one continuous lace braid that circles the head.
- Lift the braids across your crown.
- Pin the tails behind the opposite ear and tuck ends under for a seamless look.
- Loosen segments for softness and mist flexible spray.
Pro tips
- Four to six pins hold the whole day if you crisscross them.
- Pearl pins or a slim ribbon thread read festive without trying too hard.
- Leave wisps at the hairline if you love softness.
3) Fishtail Side Braid
You want texture that looks complex but braids fast. The fishtail side braid brings drama without commitment.
Why it works in winter
The fishtail clumps micro-sections into a smooth rope that resists static and looks fuller under a coat collar.
How I do it
- Sweep hair to one shoulder.
- Split into two equal sections.
- Take a small strand from the outside of the left and cross to the inside of the right.
- Repeat from the other side.
- Continue to the ends, tie off with a clear elastic, and pancake for volume.
Pro tips
- Serum on fingertips keeps the pattern sleek.
- Start the braid below the shoulder so scarves don’t crush the top.
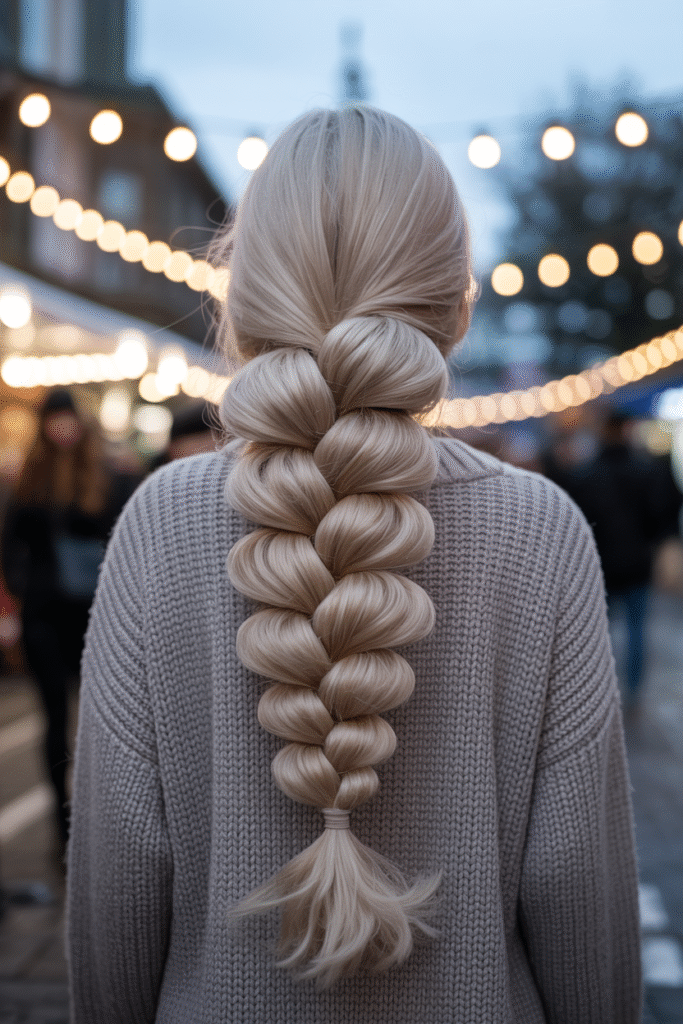
4) Rope Braid Pony
You like minimalist lines and speed. A rope braid pony takes two minutes and looks sleek under a trench or puffer.
Why it works in winter
A rope braid twists two strands in the same direction and crosses them in the opposite direction, so it locks tight and fights frizz.
How I do it
- Make a low pony with a satin scrunchie.
- Split the tail into two.
- Twist both sections clockwise.
- Cross the right over the left counterclockwise and repeat to the ends.
- Tie off and smooth with a drop of oil.
Pro tips
- Start with day-two hair for grip.
- Hide the elastic by wrapping a tiny strand around the base and pinning it underneath.
5) Four-Strand Plait
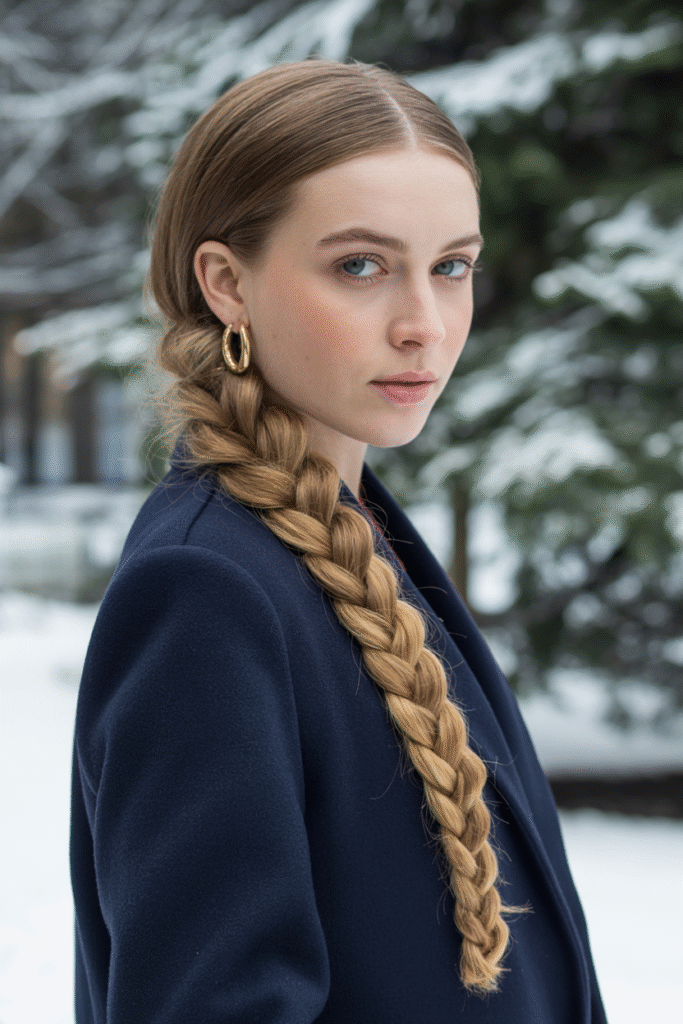
You want that “how did you do that?” reaction. This braid gives dimension with zero heat.
Why it works in winter
Extra strands create thickness without teasing. The flat structure slides under scarves without snagging.
How I do it (over-under pattern)
- Split hair into four equal strands: 1, 2, 3, 4.
- Cross 1 over 2, then under 3, then over 4.
- Now move the new outer strand from the other side and repeat the pattern.
- Keep tension even.
- Tie off and fan edges for width.
Pro tips
- Practice the pattern once with ribbon so your hands memorize it.
- Flexible spray keeps it tidy without stiffness.
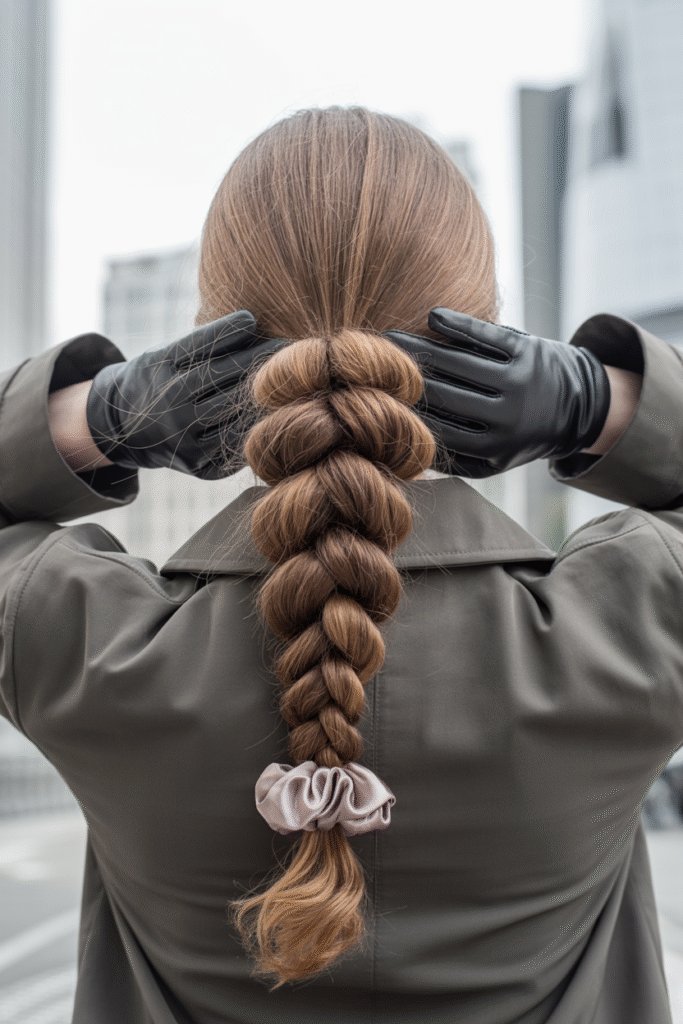
6) Pull-Through Braid
You want big, bubbly volume that photographs beautifully. The pull-through braid cheats thickness even on finer hair.
Why it works in winter
It uses stacked ponies instead of twists, so it stays plush after a hat and bounces back when you remove the beanie.
How I do it
- Create a low pony.
- Create a second pony right under it.
- Split the top pony in two and bring the halves around the bottom pony, then secure them underneath to create a new pony.
- Repeat down the length.
- Gently tug each section for cloud-like fullness.
Pro tips
- Micro elastics keep it neat.
- Serum on the tail prevents fuzz as sections expand.
7) Braided Bun
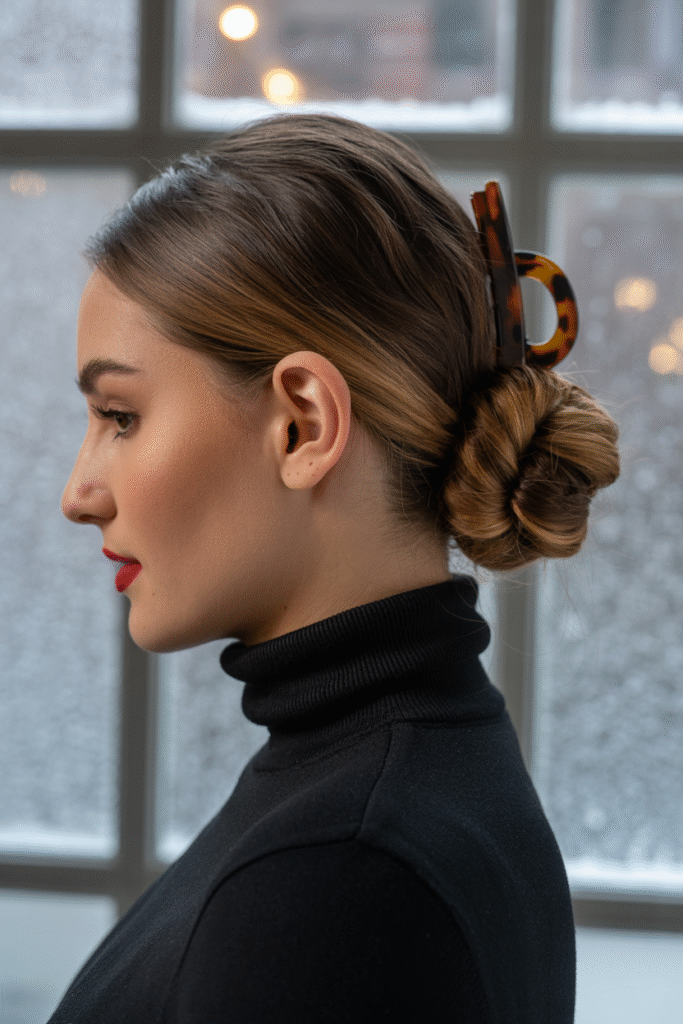
You want sleek protection for ends and a polished finish for dinners or office days. A braided bun gives elegance without effort.
Why it works in winter
You tuck ends away from collars and zippers, so you prevent breakage and preserve shine.
How I do it
- Make a low pony.
- Braid the pony in your favorite style: three-strand, rope, or fishtail.
- Coil the braid around the base and pin at four points like a compass.
- Smooth flyaways with a dab of balm.
Pro tips
- Silk scrunchie under the bun cushions friction.
- Matte claw clip works when you want zero pins.
8) Accent “Viking” Braids
You want a subtle edge without going full cosplay. Accent braids add detail around the face while the rest stays free.
Why it works in winter
You control the hairline where static hits hardest, while your lengths flow for softness. You also avoid hat dents because small braids sit flat.
How I do it
- Part slightly off-center.
- Create one or two tiny Dutch or rope braids on each side near the temple.
- Secure the tails under the canopy with small elastics.
- Leave the rest loose or wave the ends.
Pro tips
- Hair rings or tiny cuffs add Nordic flair.
- Salt spray gives grip so baby braids stay crisp.
9) Waterfall Braid with Tucked Ends
You want ethereal vibes for a winter brunch or low-key party. The waterfall braid frames the face and keeps everything soft.
Why it works in winter
The cascade distributes weight across the crown, so hats sit better and you avoid bulky spots. Tucking the ends keeps fragile tips safe.
How I do it
- Start near the temple.
- Cross the top section over the middle like a lace braid, then drop the bottom section to create the waterfall.
- Pick up a new bottom strand and continue across the back of the head.
- Secure near the opposite ear and tuck the end into a low twist or bun.
Pro tips
- Shine spray highlights the pattern.
- Loose front tendrils keep the look cozy, not formal.
Product Face-Off: What Holds in Cold Air?
I keep winter styling simple. I pick textures that support braids instead of fighting them.
Serum vs. Light Oil
- Serum: Light, anti-frizz, great for fine or medium hair. You add gloss without weight.
- Light oil: Richer, better for coarse or thick hair. You seal like a champ with a single drop.
Flexible Spray vs. Strong Hold
- Flexible: Moves with you and resists that stiff, crunchy vibe. Perfect for braids and buns.
- Strong hold: Reserve for high winds or sleek moments. You risk flakes in cold air if you overdo it.
Mousse vs. Texture Spray
- Mousse: Boosts root hold and gives slip control before braiding.
- Texture spray: Adds grit for fuller, wider braids and helps pancakes stay.
My minimal trio that wins winter: Leave-in + serum + flexible spray. IMO, that combo handles 90% of situations 🙂
Technique Tweaks That Change Everything
- Start with day-two hair when you can. You get natural grip without extra product.
- Set your part first so you don’t fight it later.
- Hide elastics by wrapping a tiny strand around the base and pinning the end underneath.
- Finish ends last with a half-drop of serum so you keep control while you braid.
- Carry a pocket comb to erase hat lines fast.
- Treat hair like knitwear. Gentle touch. Minimal friction. Maximum cozy.
Troubleshooting: Static, Frizz, and Hat Dents
Static shows up? Warm a micro-drop of serum in your palms and sweep the canopy. A silk-lined beanie prevents the next round.
Frizz by noon? Spritz a 50/50 blend of water and leave-in, then press with a microfiber towel. You refresh shape without starting over.
Hat dent at the crown? Flip your hair, blast roots with cool air for ten seconds, and shape with fingers. The dent gives up.
Braids slip? Dust your hands with texture powder and rebraid the top two passes. Grip returns instantly.
Interactive Braid Picker
Use this quick tool to choose a Nordic braid based on your day, hair length, and whether you plan to wear a hat. Tap “Suggest My Braid” and get accessories and quick-fix tips.
Hair Length
Plan
Hat or No Hat?
What to Wear With Each Braid
- Dutch Twin Braids: Pair with a knit headband and a quilted jacket. You keep ears warm and avoid crushing the braid base.
- Crown Braid: Add statement earrings and a wool coat. You balance volume on top with sleek lines below.
- Fishtail Side Braid: Wear a soft scarf and glossy lip balm. You double down on texture and shine.
- Rope Braid Pony: Match with a structured trench for clean lines.
- Four-Strand Plait: Throw on a long cardigan for folk-romantic vibes.
- Pull-Through Braid: Choose cozy knitwear and dewy makeup for softness.
- Braided Bun: Pair with a turtleneck and cat-eye. Classic never fails.
- Accent Braids: Stack tiny cuffs and midi hoops for edge.
- Waterfall Braid: Add a silk ribbon and shearling jacket for modern fairy-tale energy.
FAQ: Your Nordic Braid Questions Answered
Which braid holds best under a beanie?
Go with Dutch twin braids or a rope braid pony. They sit flat at the crown and keep shape when you remove the hat.
How do I stop static instantly?
Warm a micro-drop of serum in your palms and sweep it over the top layer. A silk-lined beanie prevents static from returning.
Can short or medium hair pull off these braids?
Yes. Try accent braids, a rope braid pony, or a pull-through braid that fakes volume. Medium hair loves a crown braid with added texture spray.
Do I need heavier products in winter?
You need more moisture, not extra weight. Pair a leave-in with light serum and keep flexible spray for hold. Save heavier oils for thick or coarse textures.
How often should I trim?
Aim for every 8–12 weeks. You remove splits that snag on scarves and you keep braids smoother.
Summary and Next Steps
You now own 9 Nordic braid styles that thrive in winter: Dutch twin braids, crown braid, fishtail side braid, rope braid pony, four-strand plait, pull-through braid, braided bun, accent “Viking” braids, and the waterfall braid with tucked ends. You also have prep steps that calm static, product matchups that keep shine, and technique tweaks that make your braids last. You can plan your look with the Braid Picker and roll out the door with warm ears and pretty hair.
Pick one style for this week and wear it twice. Snap a photo after your hat comes off and judge the hold honestly. Keep the winner on rotation and retire the rest without guilt. Winter can feel harsh, but your braids can look soft, structured, and smug about it—IMO that’s the exact energy we all want right now 🙂