
Have you ever bundled everyone up for a chilly morning, only to realize your kid’s hair has gone from “cute” to “chaos” the second the hat goes on? I’ve been there more times than I can count. If you’re wondering how to keep little heads warm and adorable without fuss, winter braids are your best friend. Here’s the thing: you don’t need salon skills or a drawer full of products. A few simple tricks can make school mornings smoother, hat hair a non-issue, and your kiddo feel super proud of their style.
Why Winter Braids Work (and Why Moms Love Them)

Quick take: Braids protect, organize, and stay put. That’s everything you need on a drizzly school run or a windy playground.
- Warmth + neatness: Braids keep strands together so hats slide on and off without creating static or tangles.
- Protection: In cold, dry air, hair can get brittle. Braids minimize friction from scarves and coats.
- Speed: Once you know a few go-to styles, you can braid in 5–10 minutes and get out the door.
- Comfort: Loose starts (the first 1–2 cm at the hairline) stop pressure headaches under beanies.
- Confidence: Kids love having a “signature” braid; it makes winter layers feel fun instead of bulky.
Key takeaway: Choose styles that match your time, your child’s hair texture, and the day’s plan (PE day, photo day, party day).
The Simple Winter Braid Kit (Everything You Actually Need)
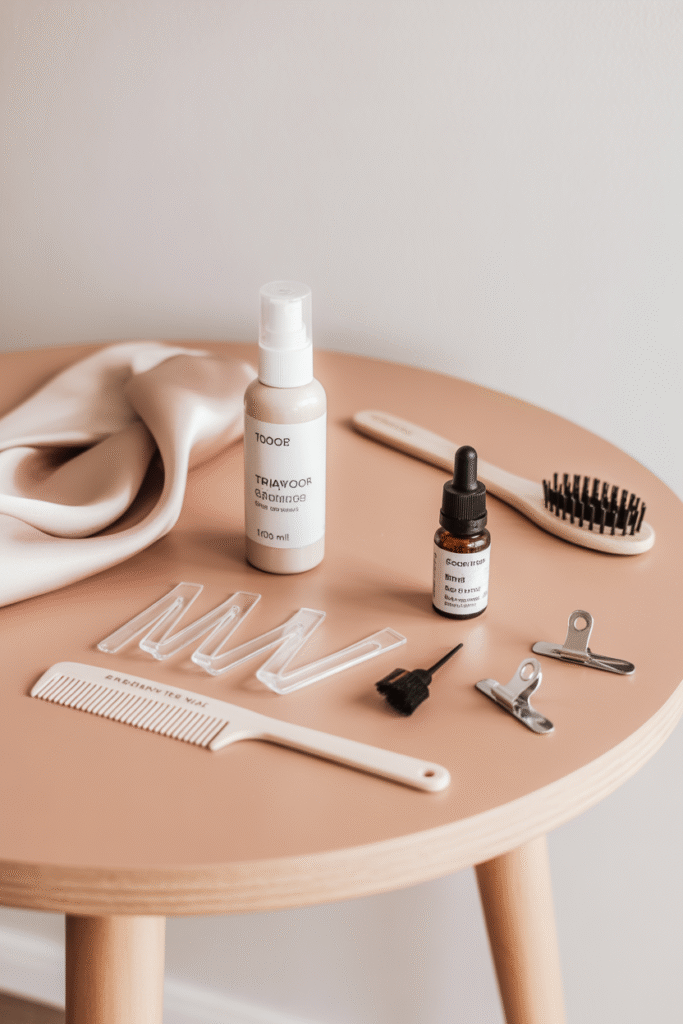
You don’t need a fancy cart. A small pouch is enough, and it makes travel, carpools, and holidays easier.
- Detangling spray or water mister (100–150 ml travel bottle).
- Wide-tooth comb + soft brush for smoothing.
- Snag-free elastics (clear or color-coded—kids love picking colors).
- Light leave-in conditioner and a drop or two of oil (argan, jojoba) for ends.
- Tiny edge brush (optional) and a pea-sized gel if you like a polished hairline.
- Satin/silk scrunchie or thin satin scarf to reduce friction under hats.
- Mini clips (2–4) for flyaways.
- Bonus: Ear-friendly headband for very cold days (fits under helmets and hats).
Pro tip: Keep a “car kit”—mini mist, elastics, and two clips—in the glove compartment. It saves the morning when you’re halfway to school.
Prep Like a Pro: Fast, Gentle, and Kid-Friendly
The 3-minute prep routine

- Mist lightly from mid-length to ends (you want flexible, not wet).
- Smooth a pea-sized amount of leave-in through the ends.
- Seal with 1–2 drops of oil on the outer layer to fight static.
- Parting tip: Use the tip of a comb or your finger to make a clean part. Kids love “lightning bolt” or “heart” parts—keep it simple on school days.
Key takeaway: Moisture + smoothness = fewer tangles at bedtime. Don’t overdo products; think “whisper,” not “glob.”
Pick-Your-Morning: Braid Ideas by Time and Hair Length
If you have 5 minutes

- Two low pony braids: Part down the middle, braid, secure. Hats slide on easily.
- Side rope twist: Twist two sections to the side and secure near the ear—adorable under earflap hats.
- Single low braid: Great for long hair and backpacks; feels comfy with scarves.
Make it fun: Let kids pick elastic colors—ice blue, plum, soft pink make winter coats pop.
If you have 10–15 minutes
- Dutch pigtail braids: Start loose at the hairline so the beanie doesn’t pinch.
- Accent braids into pony: Two small front braids feeding into one low pony braid—stays tidy through recess.
- Half-up braided crown: Two small braids meeting at the back; leave the rest down or in a loose braid for softness.
If you have 20 minutes (weekend or special day)
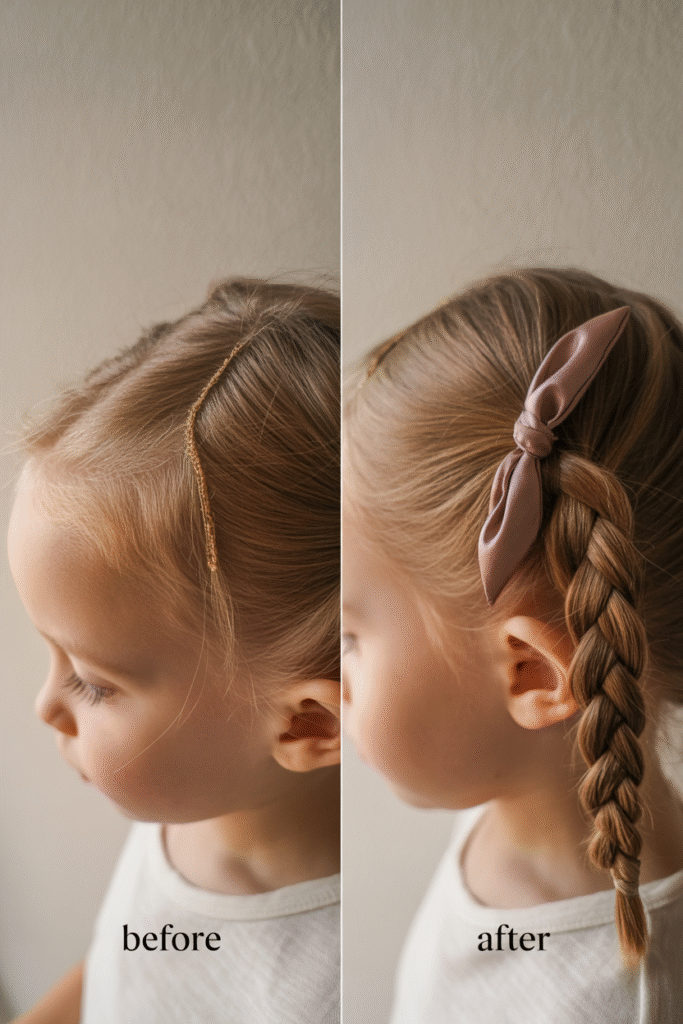
- Heart part with twin braids: Draw a simple heart part with the tail of a comb, braid each side.
- Fishtail side braid: Looks fancy; keep it slightly loose for comfort under hats.
- Mini box-braid accents: A few skinny braids at the front that can tuck into a bun or pony on busy mornings.
What I love about this: once you learn one “weekend style,” you can re-wear it for two to three days with tiny touch-ups.
Hat-Friendly Braids (So the Beanie Plays Nice)
Best placements for comfort
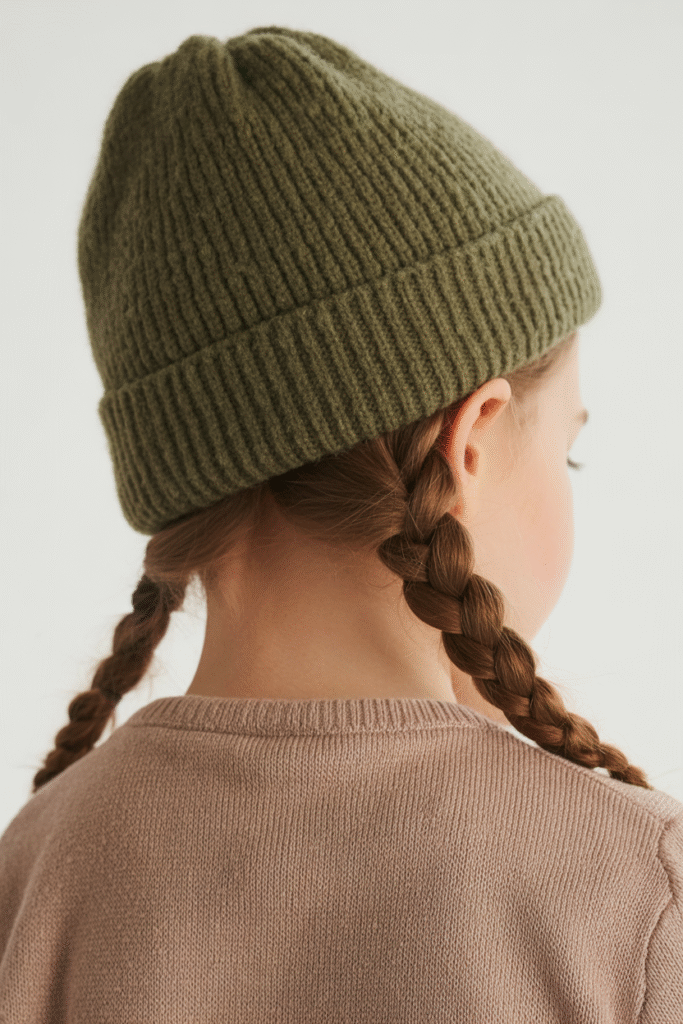
- Low and forward: Keep starts a tad back from the hairline (about 1–2 cm).
- Over-the-shoulder: Pull braids forward before the hat goes on—prevents a bulky “bump” at the back.
- Slouchy beanie days: If the braids are thicker, slouchy hats give extra room so nothing feels tight.
Match braid to hat style
- Cuffed beanie: Two front braids or a single low braid.
- Beret: Side-swept micro braids or a soft crown braid (very cute for concerts or holiday events).
- Trapper hat: Mid or low braids so flaps sit flat.
- Helmet (sledding, skating): Low braids that clear the back of the helmet for safety.
Key takeaway: Comfort beats perfection—if your child is fiddling with the hat, loosen the first 2 cm of the braid.
Cozy, Comfy, and Healthy: Scalp & Hair Care in Cold Weather
Keep it gentle
- Wash rhythm: Aim for every 7–10 days or as needed. Use diluted shampoo along parts, rinse well, and fully dry before hats.
- Moisture top-up: A small spray of aloe or water + leave-in midweek keeps braids fresh.
- Edges & tension: If you see redness at the hairline, switch to looser starts the next day.
Static and snags
- Satin barrier: If you don’t have a satin-lined hat, tuck a thin satin scarf inside the beanie.
- Skip plastic combs right before hats; fingers or a boar-bristle brush create less static.
- Coat collar trick: Tuck braid ends into the coat collar on windy days to avoid whipping.
What I’ve found is that less product near the scalp = happier hats (no buildup under knitwear).
Styles Kids Love (and Moms Approve): Ideas by Vibe
Everyday school-ready
- Twin Dutch braids with colored elastics—teal, berry, or gold brighten uniforms.
- Low braided pony with two tiny accent braids in front.
- Mini side braid tucked behind the ear for kids who dislike hair on their face.
Playdate or party

- Ribbon-laced braids: Thread a 1 cm ribbon through the last 5–7 cm of the braid.
- Sparkle clips: Two mini star clips near the temples make instant “holiday.”
- Soft crown braid with a simple bow at the back—photo-perfect yet comfy.
Photo day or concerts
- S-shaped part feeding into two neat pigtail braids; ends curled under with soft ribbons.
- Fishtail side braid with a satin bow.
- Half-up rope twist finished with a pearl-look clip (plastic pearls are light and comfy).
Key takeaway: Add one small accent (ribbon, bow, or clip) and keep the rest simple. Kids move a lot; simplicity survives the day.
Accessories That Actually Help (And Ones to Skip)
Do use
- Snag-free elastics (have 20–30 on hand; they disappear).
- Satin scrunchies for bedtime or low buns.
- Thin satin scarf to line hats or wrap hairline for 2–3 minutes after styling—sets everything smoothly.
- Flexible, soft clips with rounded edges.
Consider skipping
- Metal clips with sharp teeth (they tug under hats).
- Very tight headbands (headache city).
- Heavy decorative pieces (cute but fall out at recess).
Pro tip: Keep a color palette that matches winter coats—cream, taupe, cranberry, navy—so everything looks coordinated without extra thought.
Step-by-Step: Three Foolproof Winter Braid Tutorials
A) Two Low Pony Braids (5–7 minutes)
- Mist and smooth a tiny bit of leave-in.
- Part down the middle, gather two low ponytails at the nape.
- Braid each pony; tie with elastics.
- Rub one drop of oil between your palms and smooth over the outer layer.
- Put on the hat after you bring both braids forward.
Why moms love it: Fast, comfy, hat-friendly. Works on straight, wavy, and curly textures.
B) Dutch Pigtail Braids (10–12 minutes)
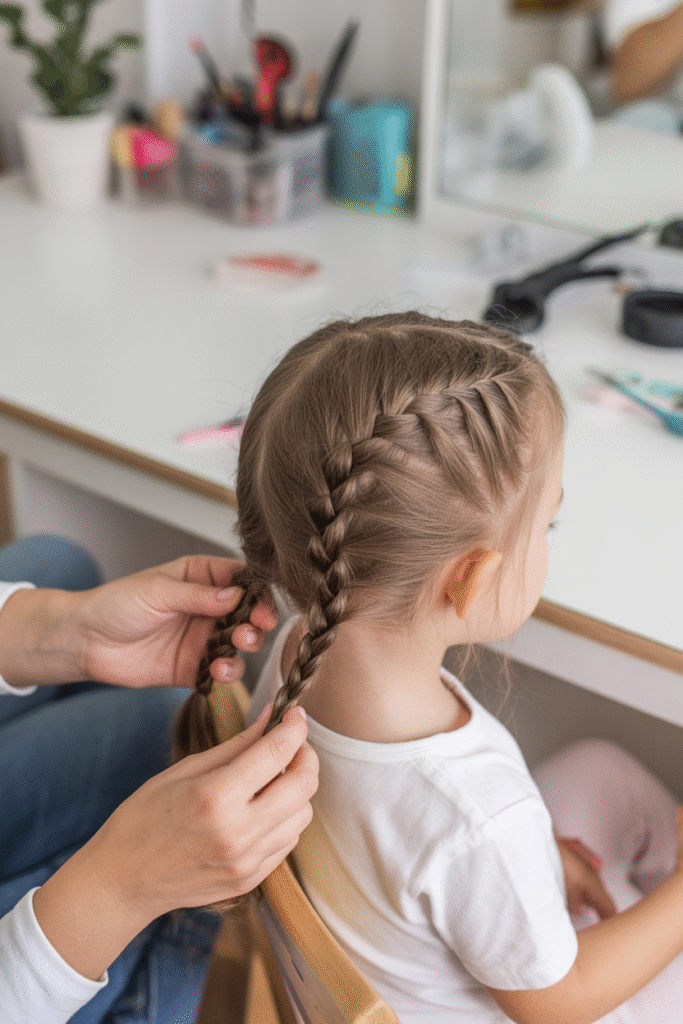
- Create a center part; clip one side away.
- On the first side, pick up three sections near the hairline and gently add hair as you braid along the scalp.
- Keep the first 1–2 cm loose for comfort; go tighter as you move away from the hairline.
- Repeat on the other side; finish with elastics.
- Mist hands, smooth flyaways; scarf-set for 2 minutes if you want a sleek finish.
Detail to remember: Dutch = braid sections under, giving a raised, defined look that shows up in photos.
C) Fishtail Side Braid (12–15 minutes)
- Sweep hair to one side and split into two equal sections.
- Take a thin piece from the outside of the left section, cross it over to the inside of the right section.
- Repeat on the other side; keep the pieces small for a “fancy” pattern.
- Stop 5–7 cm from the end, tie off, and gently pancake (widen) the braid for softness.
- Add a ribbon or bow for a pretty finish.
Kid-tested tip: If arms get tired, rest for 10 seconds halfway. We want happy hair and happy kids.
Keep It Fresh All Week (Without Starting Over)
Night routine (2–3 minutes)

- Wrap with a satin scarf or pop on a bonnet.
- Tuck braid ends inside the scarf so they don’t rub the pillow.
- Spot-check in the morning; re-tie elastics if needed.
Midweek refresh
- Mist hands (not hair) and smooth the surface.
- Edge brush for 15 seconds if you like a tidy hairline.
- If ends look fuzzy, add mousse and scarf-set for 10 minutes while they eat breakfast.
Key takeaway: Small touch-ups beat full restyles. Save time for hot chocolate and story time.
Troubleshooting: Real-Life Fixes
- Hat dent at the hairline: Loosen the first 2 cm of the braid next time; use a slouchier hat or line the hat with satin.
- Static “halo”: Satin barrier + pea-size serum on the outer layer before the hat.
- “My head hurts!”: Braid more loosely at the start, switch to low braids, and check elastic tension.
- Braids riding up: Bring braids forward before putting on the coat; choose stretchy ribbed beanies.
- Frizz at the crown: Smooth with a tiny bit of leave-in and do a quick 2-minute scarf set.
Don’t sweat it! Every head is different. A tiny tweak usually solves the problem right away.
Safety and Comfort Notes (Because Mom Radar Is Always On)
- No heavy accessories for sports or PE.
- Check pressure points at temples and behind ears after hats go on.
- Tuck ends on windy days to avoid whipping eyes.
- Use soft elastics and replace any that feel sticky or tight.
- If your child says “ouch,” stop, breathe, and loosen—no style is worth discomfort.
Here’s what professionals recommend: gentle detangling from ends upward, loose tension at the hairline, and full dry before hats to avoid scalp irritation.
Holiday-Ready (But Still Easy)
- Candy-cane ribbons in twin braids (red + cream).
- Glitter-look clips (lightweight plastic) near the temples.
- Braided headband using a small front section—adorable with ear-warmers.
- Photo day hack: Pack a mini mist and two clips; a 30-second touch-up before pictures works wonders.
I like that these feel festive without taking all morning. Keep it simple so kids can still run, dance, and enjoy the day.
Winter Braid Planner (Pick, Prep, and Go)
Use this quick planner to pick a braid based on time available, hair length, sensitivity, and hat type—then grab a personalized prep checklist. It’s simple and kid-approved.
Winter Braid Planner
Choose your morning, and I’ll suggest comfy, hat-friendly braids + a tiny prep checklist.
FAQ: Quick Answers Moms Ask Me
How tight should I braid?
Loose at the start, snug in the middle. You want the first 1–2 cm to feel comfy under hats, then you can firm up the tension so the braid holds.
What if my kid hates hats because of hair pull?
Try slouchier knit hats or line the hat with a thin satin scarf. Also, position the hat a little behind the hairline instead of right on it.
How do I fix static fast?
Before the hat goes on, smooth the outer layer with one drop of serum or a pea-size leave-in. A satin barrier is magic on very dry days.
Which braid is best for sports?
Keep it low and out of the way—two low pony braids or a single low braid. For helmets, avoid bulky buns.
Wrap-Up: Keep It Simple, Keep It Cozy

Here’s the easy formula I come back to: a minute of prep + a comfy braid placement + a kid-approved hat. That’s it. Start with one or two ideas—maybe twin Dutch braids for school and a fishtail side braid for the weekend—and see what your child loves. It’s amazing what a few simple touches can do!